money trees plant shop Money Tree for Sale
SKU: 68425972211
money trees plant shop

money trees plant shop Money Tree for Sale

Sale price$23.87 Regular price$26.52
Save 10%

Pay in installments of $6.63 with ShopPay, AfterPay and Klarna

Shipping Estimate
USA
  • USA
  • CAN

Ships within 48 hours · Estimated delivery Jun 29 - Jul 4

Promo Codes Available:

For Your Every Summer RSVP, with Code: SUMMER15

Description

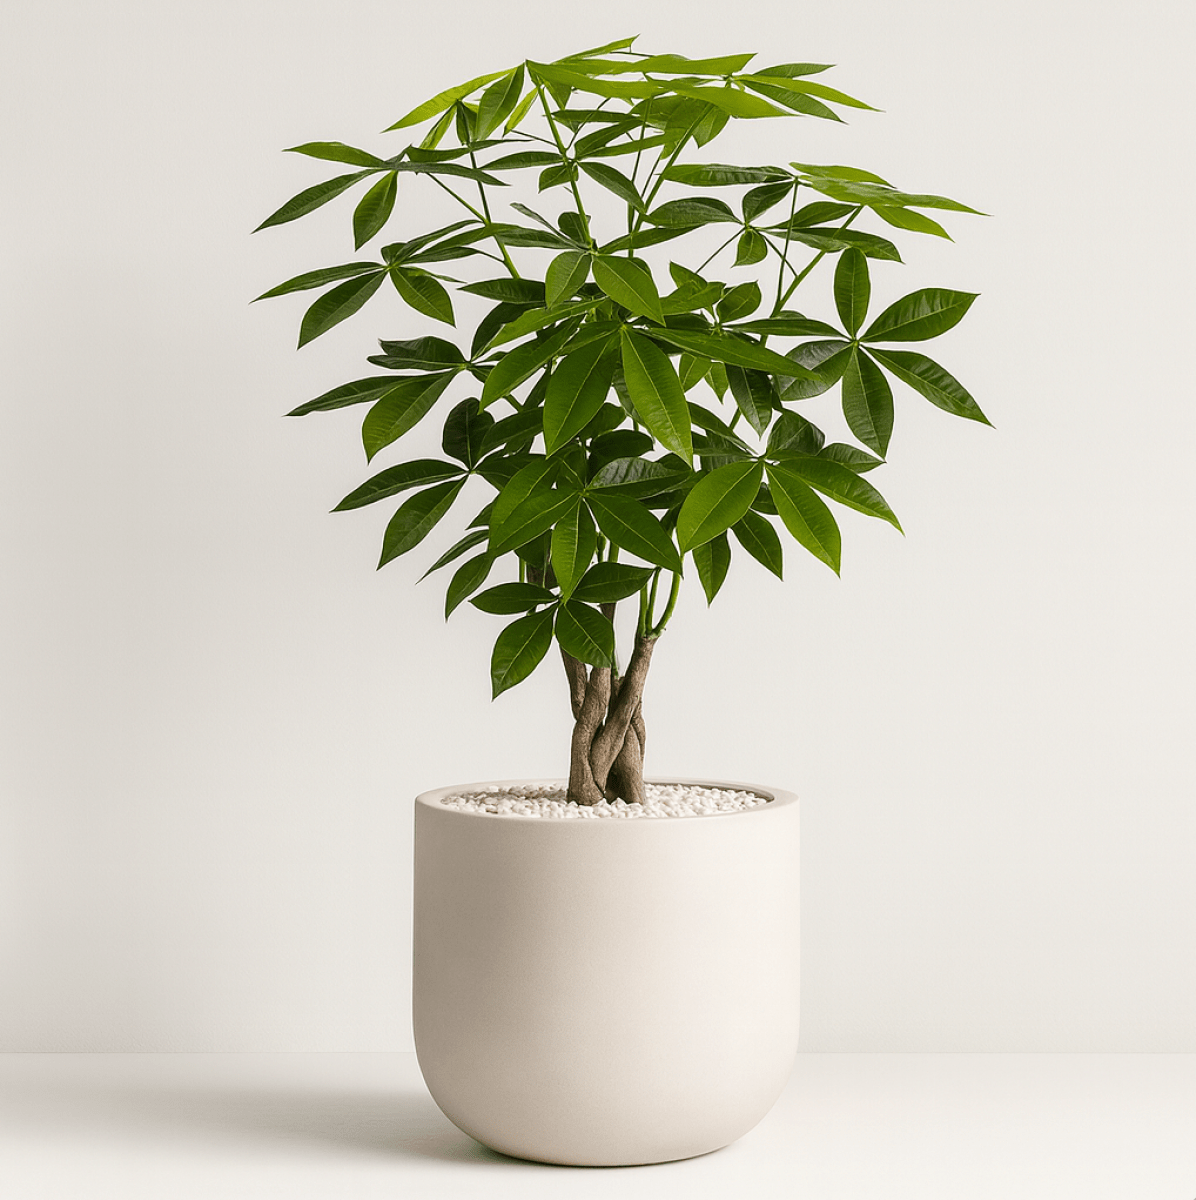
money trees plant shop Money Tree for SaleMoney Tree Braided Looking for a beautiful and low maintenance houseplant that brings good luck? Look no further than the Money Tree Braided, Pachira Aquatica, Good Luck Tree! With its unique braided trunk and lush green leaves, this plant is not only a stunning addition to any room but also believed to bring good fortune and prosperity. How to Grow The Money Tree Braided is a slow growing plant that thrives in bright, indirect sunlight. It prefers

Money Tree Braided

Looking for a beautiful and low-maintenance houseplant that brings good luck? Look no further than the Money Tree Braided, Pachira Aquatica, Good Luck Tree! With its unique braided trunk and lush green leaves, this plant is not only a stunning addition to any room but also believed to bring good fortune and prosperity.

How to Grow

The Money Tree Braided is a slow-growing plant that thrives in bright, indirect sunlight. It prefers well-draining soil and should be watered only when the top inch of soil feels dry to the touch. This plant can also tolerate lower light conditions but may grow more slowly.

Care Tips

To keep your Money Tree Braided healthy and happy, make sure it is not overwatered, as this can lead to root rot. It is also important to avoid placing it in direct sunlight, which can scorch the leaves. Pruning can be done to control the growth and shape of the plant.

Uses

The Money Tree Braided is a popular choice for home and office decor, as it is believed to bring good luck and fortune. It is also a great gift for occasions such as housewarmings, weddings, and birthdays.

Planting Tips

When planting the Money Tree Braided, ensure that the soil is well-draining and that the plant is not placed in direct sunlight. It is also important to choose a container that is the right size for the plant, as a container that is too large or too small can affect the plant's growth.

Maintenance

To maintain the health of your Money Tree Braided, ensure that it is watered only when the top inch of soil feels dry to the touch. Pruning can also be done to control the growth and shape of the plant.


Shipping Notes
  • Free Standard Shipping on $100+ Orders to the USA.
  • Except Preorder products are shipped in 48 hours.
  • Delivery to the USA:
  1. Standard Shipping : 3-10 business days
  • If time is of the essence, please consider selecting expedited delivery for faster service.
Exchange/Return Notes
  • We offer a 30-day return/exchange service after receiving.
  • Final sale items are not eligible for returns or exchanges.
  • To process your return/exchange, please contact us at [email protected]
  • Please click here for more details>>> Return & Exchange Policy
SKU: 68425972211

Discover Niche Categories That Outsell money trees plant shop

Top-Converting Item to Boost Your Average Order

4.4 ★★★★★
Based on 699 reviews
Sort
Highest Rating
Newest First
Oldest First
Product Reviews
T
Verified Purchase
Talagand
Boise, US
★★★★★ 4
Reasonably adequate room divider
Size: 4 Panel-88'', Color: Beige
I'm reviewing this as I assemble it. Couple things: 1. I didn't expect as much assembly. I've ordered dividers before and they more-or-less came as one unit. Sometimes the panels needed screwing together. These require complete assembly and come largely as three rods: two make up vertical columns and snap together. Another one (called part "C") makes the horizontal columns and you have two of these per panel (one attaches to part "A" and the other part "B"). These parts are metal with a plastic shim. Using the wood screws to attach to part "C" is a real pain in the neck. There's not much holding the panel in place so it's a little tricky. One tactic I've found while I'm assembling that works for the initial connections from parts A and B to their respective "C" rods is to hold the screw in place with a screw driver and then rotating the rod around the screw. This will do a number on your hands if you aren't wearing gloves. This obviously doesn't work when completing the connection. Using a driller driver on this is really near impossible because there isn't anything you can use to secure it in place. You can use it on the first panel, but as it gets longer, it becomes increasingly difficult and because it isn't wood, it's really tight. I considered drilling larger pilot holes but since there are only 4x4=16 screws I need to screw in, I just decided to use my screw driver to complete it. 2. Also related to assembly. When completing the panels (attaching parts "A" and "B" to parts "C" that have the cloth cover on it), you have to be careful that when you tighten that side that it isn't loosening the other side. Because the pilot holes are so tight, you can end up rotating the rod, which rotates it in the same direction as looser on the original side. Having someone hold the "C" rod in place while you screw it in is probably the easiest approach. I didn't have a 2nd person, so I just had to keep flipping back and forth and tightening both sides as I screwed it in. Not the worlds biggest deal, but annoying nonetheless. 3. The way the instructions are written, they seem to suggest building this thing progressively; that is, you do panel 1, then 2, connect them together, then do 3 and connect it, etc. I took a different route that I suspect saved me quite a bit of trouble, and I assembled all four panels first and THEN connected everything together. 4. For the love of God make sure you check that the plastic tip is on the same side for every panel. Otherwise, you have to take one side apart again and reverse it. On the bright side, if this happens, you've essentially bored out the pilot holes to be the correct size... which is having me question if I shouldn't have just bored them out to the appropriate width in the first place. 5. Attaching all of the panels together is also an enormous pain in the ass unless you happen to have an 88" long elevated surface. Attaching the legs either requires you to elevate one side, which will invariably twist the inexplicably cheap material in the bottom connectors... or you can attach them sideways... or you can put this thing upright, having two people hold the panels in place while you use the allen wrench to tighten the bolts on the underside. None of those are particularly great options. NOW on to the utility itself. 1. The panels do let some light through (I didn't believe their advertising, and that was one of the reasons that I bought beige, is that I wanted it to not be too dark). They aren't transparent though, so it isn't that far off from their description. They functionally work great, and keep the mess of wires hidden and when I'm sitting at my desk, actually reflect quite a bit of light into my office. Great! 2. My wife has described these as "the most hideous piece of furniture ever conceived of by man." So it does not have spouse approval factor. Granted, she will seldom be in my office area, so that isn't the end of the world. 3. These are really hard to align in a way that doesn't look a little tacky. There are some plastic connectors but they don't do a bang up job of keeping these in place. Each panel is slightly tilted and it's... quite obvious. I may at some point make my own improvements to these to help make them more level. It's not a particularly expensive product so I wasn't expecting much so it's fine and I'm not going to ding them on the rating because of it. All said, would I buy this product again? Probably not. It's assembly was ~90 minutes which is about 75 minutes longer than I was anticipating spending on this (not including the 5 minute writeup that I'm doing here). But am I going to return it? Also no, if for no other reason I'd be just as annoyed taking it apart and putting it in the original box to return it.
WAS THIS REVIEW HELPFUL?YesReportShare
Reviewed in the United States on October 31, 2023
A
Verified Purchase
Andy Sims
Grantham, US
★★★★★ 5
better then expected
Color: Black
very easy to put together works perfectly! very stable for the side would buy again!
WAS THIS REVIEW HELPFUL?YesReportShare
Reviewed in the United States on May 21, 2026
Y
Verified Purchase
Yuliet carreño cutiño
Fort Morgan, US
★★★★★ 3
Divisor de habitaciones
Color: Black
La entrega fue perfecta , si debo de decir que en la descripción del producto decía que media 72 ancho x 72 alto pero no fue así su ancho es de 60 .
WAS THIS REVIEW HELPFUL?YesReportShare
Reviewed in the United States on September 6, 2025
N
Verified Purchase
Nana rice
Pawtucket, US
★★★★★ 5
Good purchase
Color: Black
We used this screen to divide the beds at a hotel. It gave the perfect privacy, was easy to put up and very sturdy
WAS THIS REVIEW HELPFUL?YesReportShare
Reviewed in the United States on April 21, 2026
K
Verified Purchase
Kaylin
Fort Morgan, US
★★★★★ 1
Would not recommend
Color: Black
Product was terrible, it was not sturdy at all
WAS THIS REVIEW HELPFUL?YesReportShare
Reviewed in the United States on May 21, 2026

recommand products